Wednesday Project Review and K's Bliaut
Time to look at what I'm doing again...and I don't think I'm crossing anything else off the list yet.
• V's RenFest outfit:blouse, skirt, sash, and decoration
• My RenFest outfit: blouse and sash, and decoration
• 12th-century suit for K: bliaut, shirt,braies, and hose (and garters!)
• Late Turkish ensemble for Liz in Texas: shirt, pants, coat, veil, and hat
• Blue linen work dress
• Yellow wool bliaut
• Blue and red silk bliaut
• Ostentatious green and peach silk bliaut
• Four or five modern dresses/skirts/blouses
• Researching and practicing tablet weaving
• 12th century shoes
Nope. No finished items this week, but progress has been made: I've started sewing my RenFest blouse, working off a very similar pattern as V's. And I did one of the most time-consuming bits of K's bliaut—patterning and attaching the neckline trim, which also corrected the too-wide neckline I'd originally cut. More details below! And the goal for the coming week is to finish the bliaut.
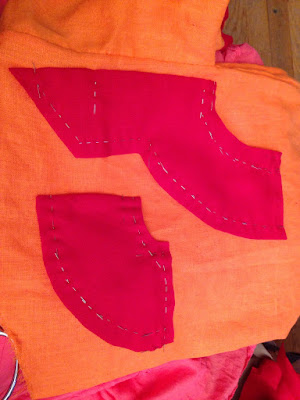
Pinned patterns for front and back trim. This involved folding a scrap of red linen so I could fit half the pattern on it, pinning important points, like the end of the neckline slit and where the neckline starts on the shoulder seams, and connecting dots until it looked right. That sounds too simple. It was more like...measure width of trim with thumb, pin edges, decide I don't like it, repin edges, stab self approximately 8374959 times, squint, repin curve (I hate smoothing out non-circular curves), decide it's good, and then realize I need a seam allowance in the middle of the piece to let me bind the raw edges of the slit. Argh, snarl, etc.
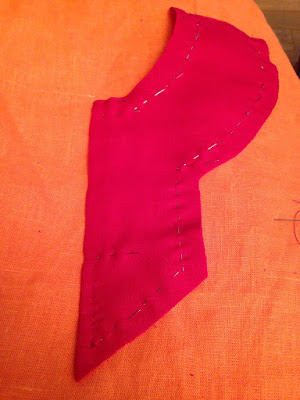
So I transferred the whole design over to another scrap (this is why I keep everything, it has nothing to do with a deeply held horror of throwing things away)
with a quarter-inch of space between the fold and the beginning of the
design (in the picture up there you can see the marking pins are offset
from the edge of the fabric). Now I have enough extra to cut the front
piece in two and bind the raw edges, and I just need a short seam at the
point to make it one piece again.
The back was much easier to pattern: match width of front trim at shoulder seam, note curve of existing neckline, ignore in favor of new and improved neckline, smooth curve. I still stabbed myself an additional 34765 times, but it was easier.
 Now with point seam sewn and just before cutting down the center line!
After cutting the front piece open, I sewed the "shoulder" seams to make front and back into one piece and used those seams and the point position to center the trim on the neckline. Of course, once I'd finally pinned the back curved edge into place nicely, I realized I'd bunched the orange up under it and it was Terrible. So I swore at it a little and repinned everything a bit at a time until it was smooth again.
 Whew.
So many pins. And I keep discovering bent ones; I think I need a
different pin holding system. The little tupperware box isn't great for
it. Anyway, the original plan was to fold over the raw red edges and
bind the raw orange inside that seam, but as you can see, the two edges
are kind of nowhere near each other. So, first folding under the orange
edge and stitching it to the red. I decided to go ahead and bind the
slit edges while I was at it, since it's pretty much a continuous edge
Whew.
So many pins. And I keep discovering bent ones; I think I need a
different pin holding system. The little tupperware box isn't great for
it. Anyway, the original plan was to fold over the raw red edges and
bind the raw orange inside that seam, but as you can see, the two edges
are kind of nowhere near each other. So, first folding under the orange
edge and stitching it to the red. I decided to go ahead and bind the
slit edges while I was at it, since it's pretty much a continuous edge and I needed to anchor the red trim so it would stop Wandering Away.
 And
then folding under the outer red edge. Everything looks terribly uneven
here, but it's actually pretty symmetrical. I think one side of the
slit is ever so slightly wider than the other, but it's very hard to
tell in person.
And
then folding under the outer red edge. Everything looks terribly uneven
here, but it's actually pretty symmetrical. I think one side of the
slit is ever so slightly wider than the other, but it's very hard to
tell in person.
 Et
voila! Outer raw edges are sewn down, and all that's left is hemming
the inner edges, adding underarm gussets (this is a fitting problem that
appears on every garment and yet somehow it did not occur to me that it
would be a factor on this one, too. Part of that may be that I was
toying with making this lace up the sides, in which case you don't need
to worry about gussets because you just lace looser there), and adding
trim to the hem.
Et
voila! Outer raw edges are sewn down, and all that's left is hemming
the inner edges, adding underarm gussets (this is a fitting problem that
appears on every garment and yet somehow it did not occur to me that it
would be a factor on this one, too. Part of that may be that I was
toying with making this lace up the sides, in which case you don't need
to worry about gussets because you just lace looser there), and adding
trim to the hem.
So that's all the fun with the Radioactive Neon Bliaut for now. Tonight I want to see about patterning gussets and maybe setting them in, and hemming the raw neck edges.
And
here's the in-progress body of my RenFest blouse! Very shimmery and
sheer and nothing-to-do-with-history. I like the seams I'm using,
though—mantua makers seams which I learned about here.
Quick to sew, if not to pin (slippery fabric that doesn't like to roll
up super tight), and I love that I only need to sew one seam to enclose
the raw edges. I'm going with similar construction as V's blouse, though
a little less added width from gores, and slightly drapier sleeves. I
like big floofy sleeves.
• V's RenFest outfit:
• My RenFest outfit: blouse and sash, and decoration
• 12th-century suit for K: bliaut, shirt,
• Late Turkish ensemble for Liz in Texas: shirt, pants, coat, veil, and hat
• Blue linen work dress
• Yellow wool bliaut
• Blue and red silk bliaut
• Ostentatious green and peach silk bliaut
• Four or five modern dresses/skirts/blouses
• Researching and practicing tablet weaving
• 12th century shoes
Nope. No finished items this week, but progress has been made: I've started sewing my RenFest blouse, working off a very similar pattern as V's. And I did one of the most time-consuming bits of K's bliaut—patterning and attaching the neckline trim, which also corrected the too-wide neckline I'd originally cut. More details below! And the goal for the coming week is to finish the bliaut.

Pinned patterns for front and back trim. This involved folding a scrap of red linen so I could fit half the pattern on it, pinning important points, like the end of the neckline slit and where the neckline starts on the shoulder seams, and connecting dots until it looked right. That sounds too simple. It was more like...measure width of trim with thumb, pin edges, decide I don't like it, repin edges, stab self approximately 8374959 times, squint, repin curve (I hate smoothing out non-circular curves), decide it's good, and then realize I need a seam allowance in the middle of the piece to let me bind the raw edges of the slit. Argh, snarl, etc.
So I transferred the whole design over to another scrap (
The back was much easier to pattern: match width of front trim at shoulder seam, note curve of existing neckline, ignore in favor of new and improved neckline, smooth curve. I still stabbed myself an additional 34765 times, but it was easier.

After cutting the front piece open, I sewed the "shoulder" seams to make front and back into one piece and used those seams and the point position to center the trim on the neckline. Of course, once I'd finally pinned the back curved edge into place nicely, I realized I'd bunched the orange up under it and it was Terrible. So I swore at it a little and repinned everything a bit at a time until it was smooth again.


So that's all the fun with the Radioactive Neon Bliaut for now. Tonight I want to see about patterning gussets and maybe setting them in, and hemming the raw neck edges.
 |
| So shiny and synthetic. |
Comments
Post a Comment