I just wrote that title so I'd sound smart; it has approximately zero to do with this project. You should probably brace yourself for an awful lot of bee-related puns, though. I won't be able to resist. (Also, Layens hives are horizontal and allow frames to be tightly packed together and
frankly it's a very accurate metaphor for what I'm doing with my pieces.)
 |
| I eyeballed that. If you follow my Instagram (@sabinebattante), you know this already. I'm very proud of it. |
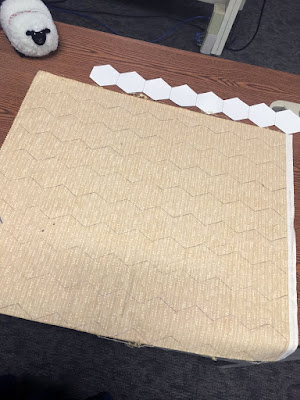
Step one for fabric pieces was to create a new template with quarter-inch seam allowances (which are
tiny, holy carp), which I did with a pen, a scrap of a flyer, and one of the punched paper templates I'm using for the actual basting.
 |
| We go high-tech here at chez d'Acre. |
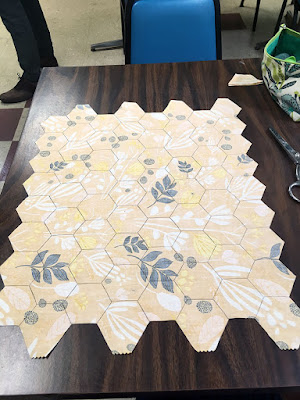
Since I'd gone to all the trouble of ironing my fabrics beforehand, I picked a few to roll around an old mailing tube (I'm not a packrat, I'm
prepared) and bring to work, where there are continuous flat surfaces larger than a fat quarter. I also transformed my single hexagon into a little paper chain to make tracing the pieces take slightly less of forever to accomplish.
 |
| Sheepy overlord is watching closely. |
AND. Look how perfectly my little hexagons fit! Look at them! I didn't even plan that! I hoped for it, but I 100% did not even think to do the math to figure out what size hexagon would make most efficient use of my fabric, and lo, I hit on pretty much exactly that.
 |
| Pencil for marking, because neither of my fabric pens is working and that ink fades very quickly. |
So. I can fit eight rows of nine hexagons each onto my fabric (counting the half-hexis on the offset rows, which I am, because they have enough extra to be pieced), plus one row of partial hexis to piece into 4.5 more. I'm calling it 72 hexagons per fat quarter, which is 144 of each print.
I have 30 fat quarters, plus four colors of silk (brown, cream, blue, and saffron) and a plain mustardy cotton—at a guess, I'm looking at about 2,500 one-inch hexagons. Which only makes up a roughly 3x5-foot quilt top. I'm not a
tall person by any means, but at least half the point of this quilt is to be able to envelop myself in it and be snug as a bug in a rug. Which I cannot do with a lap quilt. So I'm probably looking at doubling (or...slightly more than doubling) the amount of fabric I'm using.
 |
| I also complained about serged seams on Instagram. |
No more shirt deconstruction, though. For a project like this, it doesn't generate enough fabric to be worth the time investment, especially when the seams are all serged or double-folded.
 |
| The First Snip of Christmas! Or something like that, anyhow. |
I used an old insurance card I had kicking around in my sewing bag to mark the divisions between hexagons—just connect all the zigzags where they point toward each other, and voila! Hexagons!
Tessellation does mean that cutting out the hexagons is more fiddly than it might be—there are dozens of tutorials out there on cutting hexagons quickly with a rotary cutter, but that creates a lot more waste than I wanted to have. I'm already losing significant amounts of fabric to seam allowances, because I wanted to make very very tiny pieces, so every scrap I can save helps. And it was a good excuse to buy another pair of Gingher scissors, because I love my dressmakers shears, but they're way too heavy for this project.
 |
| Edges trimmed! |
I didn't really have a plan when I started cutting, but it seemed like removing all the partial hexagons from the edges would be a good first step. So I did that.
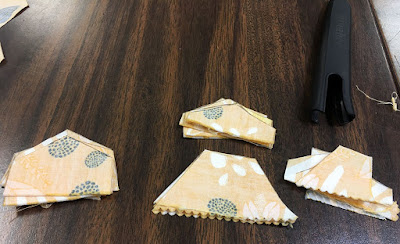 |
| Various potentially-usable pieces. |
No, I can't bear to throw them away yet. Even the ones that're definitely too small to piece together for one more hexagon.
 |
| SO PERFECT. I think that's my favorite hexi. Don't tell the other 143. |
The next thing I figured out was that if I cut the verticals first, that makes enough ease to cut the angled sides away from the main fabric more easily. Angled sides and then horizontals works, but is more difficult to do accurately. And the wee scissors have very much improved the situation. The blades are the right length for the cuts I'm making, and they weigh almost nothing compared to my heavy shears.
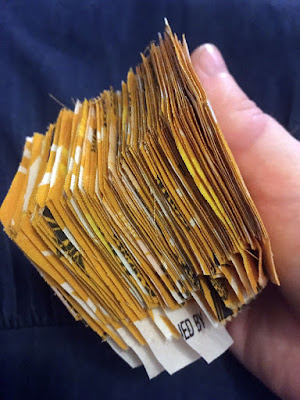 |
| You'll all know when I switch to summer skirts, because the background of my photos will change color. |
And here's two fat quarters' worth of little bitty hexagons, ready to start basting onto templates. That wasn't so bad. Only...uh...6,768 hexagons to go.


Comments
Post a Comment