At last, it's time for some actual weaving in this series of posts about...weaving. Look, most of the work happens either before you touch a shuttle or after you set it down—the interlacing of threads is the easy part.
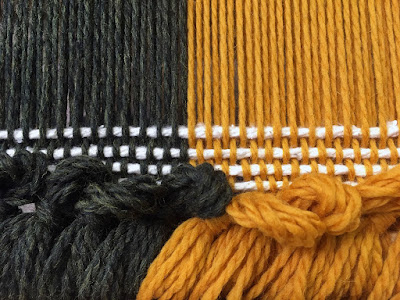 |
| No more gaps between bouts! |
Unless you tie each individual pair of warp threads onto the front apron rod, you start out with noticeable gaps between the threads of each bout, which you want to even out before you start weaving your cloth (and, in the case of things with fringe, some scrap weaving to start will give you more length to work with later). We did our scrap weaving with four picks of mop cotton, which is thick enough to match the gauge of the yarn we were using—important for proper spacing results—and smooth-surfaced enough to pick out at the end of weaving.
This was also the part where we finally got to test whether we understood the theory of weaving a folded piece of cloth on the loom. It's remarkably easy! But lapses in attention are Very Evident, so 'easy' is a relative term. You always weave two picks in sequence—if you weave only one, your shuttle stops at the "far" (underneath) edge of the cloth, and your life is more difficult than it has to be. So, starting at the upper edge of the cloth:
• Raise one shaft to lift the first layer of warp threads for the upper layer of cloth and pass your shuttle, which leaves you with the weft emerging from the fold of the fabric.
• Raise
three shafts and pass your shuttle—you aren't just lifting the first layer of warp threads for the lower layer of cloth, but both layers of warp for the upper layer of cloth, too. This pass leaves the weft emerging from the far/lower edge of the cloth.
• Raise three shafts again, but make sure this time you're raising the second layer of warp threads for the lower layer of cloth, along with the entire upper layer again. Pass your shuttle, leaving the weft emerging again from the fold.
• Raise one shaft to lift the
second layer of warp threads for the upper layer of cloth and pass your shuttle. Now you're back at the near/upper edge of the fabric, where you started.
You've woven only two picks, despite passing the shuttle four times—each pass is only half a width of fabric. Progress is visually slower than weaving a single layer of cloth, but (at least in plain weave) not painfully so.
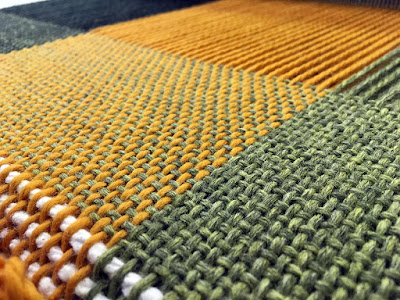 |
| I hope the way woven cloth changes the wound warp never stops being wild to me. |
Ahhhhh, weaving! With real yarn! On a real loom!
 |
| Never mind the selvedges. Just. Admire the two layers of cloth, okay? |
Selvedges do tend to be challenging—you can't see the far/lower selvedge well unless you pull the near/upper selvedge out of the way, which strains those threads ever so slightly more than their neighbors. The fold, meanwhile, needs to be tight enough to match the rest of the cloth, but not so tight that it forms a noticeably drawn-in section in the center of your work. I ended up pinching the weft at either edge with my free hand while I drew the weft across with the other hand, which helped a bit with consistency. More practice would obviously help, too, but I'm pretty content with both of my selvedges and with the center of my blanket, which was only slightly loose when I pulled it off the loom.
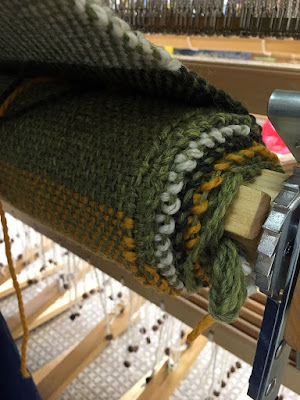 |
| The other end is overlapped as much as this end is underlapped. It's okay. |
Here you can see how different the length of wound-on cloth in the upper and lower layers are—the yellow band on the outermost layer of cloth on the cloth beam is the same stripe as the yellow that appears one layer in and about an inch down the cylinder.
 |
| "You are on your last color, right?" —The instructor, having visions of telling me to unweave. |
You are Not Supposed to weave right up to your heddles. Really. It decreases the size of the open shed you can get, because the heddles are working against your warp's desire to stay in the plane of the woven fabric and the back apron rod, and it can force you to end your project midway through a pattern repeat, or to unweave until you're at an appropriate stopping point. When I took this photo, I had eight picks left in the color pattern I'd decided on (surprise surprise,
not the one I'd intended to weave at the beginning), and I
just eked them in before there was no more space to advance the warp.


Comments
Post a Comment