We're doing a theme here at Sunshine and Roses, apparently. It's all about fixing mistakes.
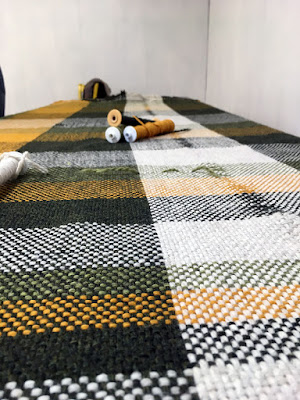 |
| Miles and miles of stripey plaid. |
I wove absolutely as fast as I dared during this workshop, because I was already taking a day off work to attend, and I knew I wouldn't be able to afford another (and I work in another city, so stopping by the shop after hours was...unlikely). As far as getting the cloth off the loom goes, that strategy worked beautifully—but I had a number of floats and skips where I hadn't quite cleared the shed well enough, in my haste.
You can also see the slight looseness of the weave at the fold in the photo above, where there's a sort of light-on-water ripple of weft color showing more clearly through the center of the white warp stripe. I could have pulled the weft just slightly tighter, to make the cloth more consistent all the way across; another way to fix it would be to weave in two new warp threads, and wriggle everything into place. Warp threads have to be added or subtracted in pairs, for plain weave, to maintain the over-under structure of the cloth.
 |
| It's very weird removing yarn from where you literally just put it. |
For mistakes close to either end of the cloth, you can work a completely invisible repair by untying the knot anchoring the warp thread involved in the mistake, pulling that thread free (carefully), and reweaving it in the correct pattern. It's easily done, but certainly not something I'd attempt with textured or delicate threads.
 |
| In and out and in and out... |
This is the same sort of repair, in a different spot on the final end of the cloth—the mistakes were denser at that end, I suspect due as much to the built-up fuzz on the heddles and reed as to my exhaustion.
When the warp thread is back where it belongs—and preferably after checking the adjacent threads for errors—you can retie the knot anchoring it, and move to the next mistake.
 |
| I don't know what happened here. |
I had a
big mass of long floats in this dark green block—only the third section I wove, so not likely to be the fault of the warp threads catching each other across sheds. You can see that most of the repair thread ends fall in two columns. I think I probably shot the tip of the shuttle just high enough to catch the upper layer of warp threads for the lower layer of cloth, pulling them down into the lowest layer of warp threads, on one pass, and then compounded the mistake on a few succeeding rows. Once the warp threads were anchored in the cloth, they'd be more prone to sticking low enough to feel right to unpracticed hands.
Anyway, to fix mistakes further into the cloth than you care to unweave warp threads (or mistakes that would involve so many warp threads you end up tired just thinking about the process), you can weave in a partial replacement weft, and snip the floating weft. You leave the ends sticking out until after the cloth is finished (technical term, in this case meaning washed and fulled), to reduce the risk of them working their way out, and then snip them off at the surface of the cloth.
 |
| Like a wee corset. |
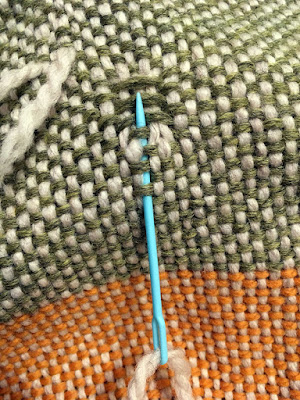
I've mentioned step-by-step isn't my forte? Here's example No. 384 of How To Fix Your Myriad Mistakes.
Step One: Identify problem—in this case, three alternate white weft threads skipped over the light green warp threads they should have interlaced with. The mistake was easier to see from the warp-faced side, so that's the way I oriented the cloth to fix it.
 |
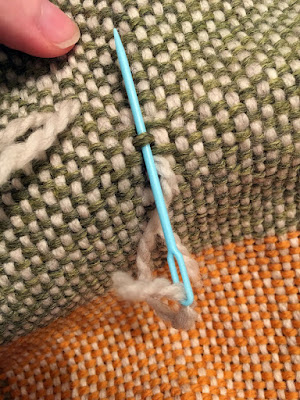
| This is remarkably fiddly work, even at such a large scale. |
Step Two: Cut a replacement weft, about three times longer than the problem area (or longer, but you don't need tremendous long tails), and thread a yarn needle with it. Start to weave the replacement weft alongside the problem weft, a few warp threads away from the problem, so your replacement weft is anchored in a correctly woven section.
 |
| I am Not A Fan of these plastic needles. |
Step Three: Continue weaving through the problem section, correcting the weave pattern as you go. Try not to catch stray bits of any of the surrounding threads—going through a thread or two might anchor your replacement weft better, but it won't look or feel the same as the surrounding area.
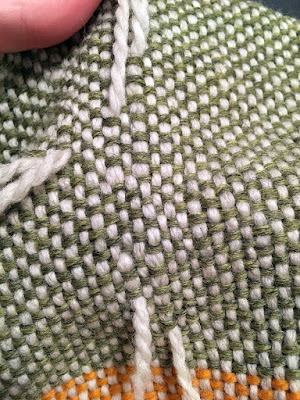 |
| Almost invisible! |
Step Four: Anchor the far end of the replacement weft by threading it alongside the problem weft where it's correctly woven. You could also wriggle the cloth between your fingers a bit to settle all the threads back in place—they do tend to get a bit smushed around when you're trying to needle-weave a replacement in the center of the cloth.
 |
| I'm not coming out until spring happens for real. |
Optional Step Five: Envelop yourself in your glorious new blanket.


Comments
Post a Comment