Last July, I finally
finished the rope bed frame I'd been planning for nearly a year at that point. I've been using it ever since, mostly with all the blankets I own piled on as a mattress, although a month ago I received the wool mattress I ordered and it's
glorious. You don't understand how glorious. I might marry it someday.
There was a dark spot on the horizon of my somnolent bliss, which was the frankly alarming creaks and snaps the frame had been making since I last tightened the ropes, pulling the side rails into a charming wasp-waisted sort of arrangement. Clearly the side rails, which I had known would be temporary, needed to be replaced with beams more suited to the job.
 |
| There's a sexuality joke to be made here, somehow. |
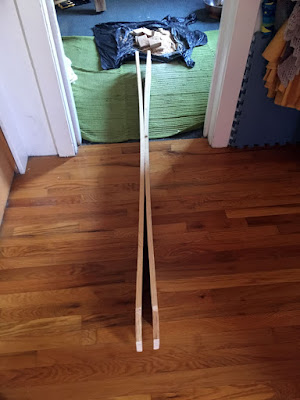
Unroping took a
while; I think I used about 200 feet of rope in the original iteration of the bed, which had to be pulled out one line at a time. Then I popped the end rails out (they're the locking mechanism of the whole structure: side rails into posts, end rails into side rails through posts, everybody stays put) and wriggled the side rails free.
 |
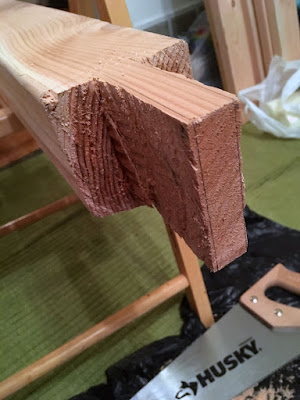
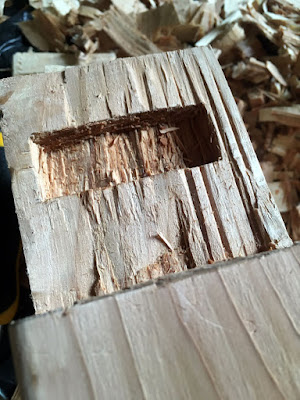
| Generally not how you want load-bearing members to look. |
They're pretty sad, and that frontmost tenon is mostly attached to the rail by habit. There isn't much uncracked wood holding it in place anymore. Yikes.
 |
| Measure twice. Maybe three times, just for security. |
The original rails started four inches longer than the total length of the mattress + two 4x4 posts, but mostly that led to me bruising my thighs (I'm short and the bed is tall, remember) on the out-sticking ends, so this time I decided to start with rails the length of the mattress + posts and skip the safety length. A daring choice, but it ended up paying off, and my arms were thankful for not having to trim the new 4x4 rails
again.
 |
| Welcome to my workshop. Yes, those are folding chairs. Yes, that is sometimes more exciting than it needs to be. |
I have neither sawhorses nor clamps, so I spent a lot of time propping beams on chairs and figuring out how to kneel on them so my hands were free for sawing. Woodworking counts as a workout if you're doing it by hand, right?
 |
| Just like planning a surgery. Mark everything that's to be removed. |
I have realized, pretty much as I write this, that it would have been wise of me to cut the mortises for the end rails in the ends of the side rails
before finishing the tenons, but that's not what I did. Instead, I measured and marked out the side rail tenons, because (having chiseled eight mortises when I made the posts) I have discovered that chiseling through 3.5 inches of cedar is not exactly a grand ol' time.
 |
| Check out that product placement! |
I managed to rough out (
very roughly) one tenon on Friday night before it got late enough that woodworking became grounds for a noise complaint. I pushed to get it done then because...
 |
| Guess which one's sopping wet, and which one I nearly caber-tossed through the ceiling? |
One of my beams was totally 100% sopping wet. All the way through. I know it's green cedar, but
dang. I bet if I planted it I'd get a tree. The sawdust was
squishy.
So I cut that tenon first, hoping that more wood exposed to the air would help it dry a little faster, and make working it later go more smoothly.
 |
| Working with the grain is so delightful. |
After roughing out the tenons with the saw (and alternating with doing dishes and scrubbing the stove, to give my arms a break) I got out my chisels and mallet for the finer work. On the dry beam, the tenon lined up perfectly with the grain, which made my life so easy. Chopping out the excess wood at the shoulder wasn't terribly fun, but lots and lots of little angled cuts later, I had a nicely shaped tenon.
 |
| Cute little filler shim, which I cleverly placed before I marked the end rail mortises. |
Of course, the original side rails were 2x8s, which meant their tenons were taller than my new side rails could possibly be. And the end rail tenons were shaped to leave a reasonable quantity of wood in the side tenon, which meant unless I got the new ones exactly centered, there wouldn't be enough wood to surround the end rail tenons.
So I got to practice my chisel skills, and split out some little shims from waste wood. This particular one fits so perfectly it won't fall out, even with test-fitting and removing the side rail.
 |
| Just ignore that giant chip. It's fine. |
After cleaning up the tenons, I test-fitted each into the corresponding mortise in the posts, and marked the edges of the end rail mortises onto each side of the tenon.
 |
| Jury-rigging at its finest. |
This is the part where not having clamps or a proper shop setup really came back to bite me. I had to chip out the new mortises without stressing the tenons too much, and without driving my chisels into either myself or the floor, and I only had about half an inch at the sides to work with. I propped the beam on the two offcuts from shortening the rails to bed length, which got it up to a more workable height, with me kneeling on the ground, and stacked the trimmed pieces from roughing out the shoulders to support the tenon against the mallet blows.
 |
| For the full effect, you need to sit/kneel on 4x4s for a few hours while viewing this photo. |
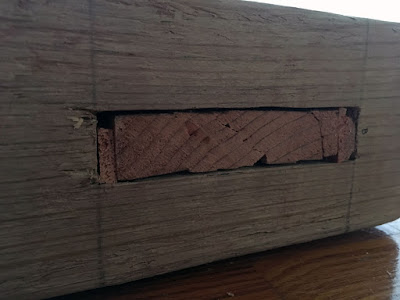
I cleverly didn't take photos of the first mortised tenon, which I managed to crack in
three places at the end, mostly due to impatient chiseling as I got closer to breaking through the remaining wood in the mortise-to-be. That was the wet beam. Really really wet. Water was welling up at my chisel blade with every stroke.
This one, I worked much more slowly and carefully, especially with the stop cuts across the grain to keep the tenon from cracking when I chipped out another layer from the mortise.
 |
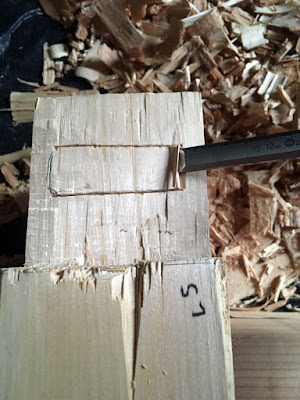
| Chip chip chip. |
Layer by fragmentary layer, trying to work from the ends toward the middles as much as possible, to minimize the chances of cracking away an entire side.
 |
| I can smell the end. And cedar. |
About this point is where I flip the beam over and start working from the opposite side, to keep from tearing out at the opposite side, and because it gets more and more difficult to get a good angle on the chisel as the mortise deepens.
 |
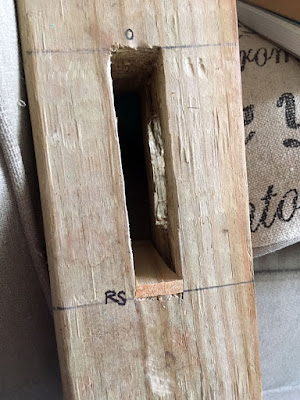
| There are five separate pieces of wood in that mortise. |
At last, time to do the final fit into the posts, and wedge each tenon firmly in place. These ones aren't going to be under any sideways pressure like the last side rails, so I'm not worried about them cracking sideways, but if they fit loosely in the posts they'll be prone to adding pressure on the end rails' tenons, which won't do them any favors. Not to mention, I don't want to be sleeping peacefully until the fateful hour when a side rail slips loose! The rope bed would have caught me; a slat bed will just fall to pieces.
I split out more little shims (or are they wedges now? They're acting in similar ways...) and shaved them down until they were just small enough to start pressing into the mortise by hand. I used the mallet to knock them the rest of the way in, which may make my life interesting whenever I try to take the frame apart again.
 |
| I am killing it with the product placement today. |
Testing testing testing.
Lots of testing, both for fit and general stability. I take the fact that I was able to take this photo of a freestanding post-and-rail assembly as a very good sign. (And note the lemon tree, the origin of all this reorganization and home improvement, sitting smugly in front of the sunny window.)
 |
| This is like the fourth time I've completely reorganized my apartment to get the space to put a bed together. |
Fitting the end rails into the first set of posts went remarkably smoothly, which probably should have been an indication that the second set would give me trouble. Finally, a bit of mallet work and cursing later—and a slight bit of reshaping the relevant tenon on the headboard—all slid together nicely.
 |
| No, those slats are not attached at all. |
The nice man at the hardware store offered to cut my slats to length for me, and not having my blueprint on me at the time, I said, oh, five feet would be lovely. Five feet is about six inches too long for what I'm planning to do with these slats, but at the moment the extra length is very handy to keep them from slipping off the rails. Eventually, when I have the energy for more woodworking (aka when my hands have forgiven me for a full eight hours of sawing and chiseling), I'll cut notches in the side rails to inset the slats, and trim the slats down to the right length to slot in and be held steady.
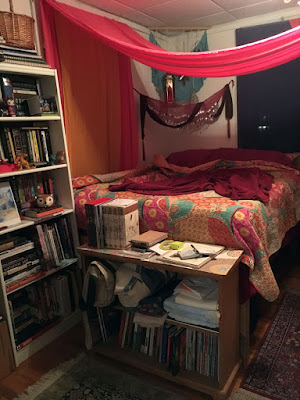 |
| It's a princess bed! |
After some wrestling with the mattress (it's made of sheep, so it should be biddable, right? Wrong. It's made of ornery sheep and also it's like 80 pounds of floppy twice-as-big-as-me-and-then-some deadweight) and the much-abused memory foam thingy I adopted from my parents, I once more have a bed I must vault onto. Lots of storage beneath, though, and it's gloriously level and squishy. I can just tell if I'm sitting over a slat or open space, but lying down I can't feel the slats.
Then again, maybe someday a second mattress wouldn't go amiss...


Comments
Post a Comment