Forgive me, I couldn't help the pun.
Having reached the end of the embroidery I can do without more detailed information about the final size and shape of the gown, I'm taking a break to make a very lazy mockup of the bodice and upper sleeves (the lower sleeves and skirt are simple enough and loose enough to not matter much for fitting purposes, though I may tack some kind of weight on the appropriate edges
just to be sure). I was going to just slap sleeves on a quick-laced bodice, but as it turns out, you have to be able to put the garment on to check the sleeve fit. Which entails making some kind of neck hole, and honestly I might as well just pattern the collar since I'm going to need it shortly
anyway.
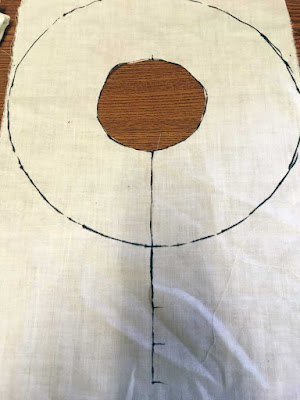
 |
| Roughly 11-inch-diameter circle, because that's how big my plate was. |
Thus, a very rough approximation of the collar, starting with a circle for the outer circumference, and the point just back of center marked as a guide. Necks on humans are mostly in front of the plane of the shoulders, so centering a round hole perfectly will just make your clothes creep weirdly.
 |
| Hand for scale. Note: my hands are quite large. Still, that center opening is only about 3.5 inches in diameter |
Of course, if I want to match the width of my other trims, I needed about 3.5 inches of width...ending with a perfectly centered hole in my base circle. Don't worry. The uncentering will return. I also slit just through the width of the circular collar to start—I didn't want to have to dig a plate out of the cupboard again to start over.
 |
| Unsatisfactory. |
Obviously, there's no way my head is fitting through this collar. It is quite the fashion statement, though.
 |
| After cutting the center slit down another two inches. |
I extended the center line, marking two, three, and four inches further from the outer edge of the circular collar so I'd have progressive options for lengthening the slit.
 |
| Much improved, despite the pre-tea thousand-yard stare. |
Two more inches did it! The collar fits over my head with just enough ease that I won't need to pull it out of shape to get the dress on and off, and the neckline will lay very nicely once I trim the tiniest bit off the front corners. Most of the wrinkling in the photo above is from holding my camera for the photo, and what wrinkling there is when I'm not stretching my arms out seems to match depictions on statuary and illuminations. I'm satisfied.
 |
| Adding the decorative panel down the front. |
I probably should have marked the front extension of the collar before I tried it on, so I could check the proportions, but this looks fine to my eye. (Yes, I will be trying it on again, I'm sure. There's no way I'm putting all that time into embroidering a collar if I'm not certain I like the size and shape.) Right now, the sides of the vertical panel are 2.5 inches each, with what ought to be a 45-degree angle in to the point. Sloppy measuring and wiggly worn-out sheet fabric may have made that less than true.
 |
| Featuring the sharpie because of course once I'd flipped the corners in place, they didn't want to fold back for a photo. |
Finally, after all that fussing, I got to trace the essential parts of the collar onto my mockup bodice. You can just see the tiny marks I used to line up the balance point of the collar with the shoulder seam of the bodice, which puts the opening about a third back of the shoulder seam and two-thirds in front of it. Theoretically that should be perfect, but I still need to fine tune the shoulder seams to suit the slope of mine and fiddle with the sleeves. I'd like better-fitting sleeves than my last few attempts, both for looks and for practicality. The closer the sleeves and armscyes fit my body, the easier a time I'll have actually
doing things in this dress...not that it's really a style meant for Doing Things. I like knowing that I can, though.
And
then it'll be back to all brown and gold all the time for a bit. I'm waiting to get the final dimensions of the upper sleeves before I start the upper arm bands, but at very most it ought to be another two feet of trim, and then I'll be fiddling with ideas for the collar embroidery and working on construction while those ideas percolate. And reading about tablet weaving as fast as I can...I have a lot to do by mid-September still.


Comments
Post a Comment