You probably already know that's a lie.
The idea was for this to be a simple, quick project that I could pull together in two weeks and wear while at the
Roots School in Vermont. In early March. In a year when winter has arrived in quite literally every part of the U.S. with a
vengeance. It's also meant to put some of
my staggering array of stashed fabric to use at last, not least because I keep seeing other lovely fabrics that I'd like to buy, and then remembering the three totes nearly-full of fabric living in the craft room closet.
Instead, it's grown into a complex, many-pieced, extremely finicky at points tunikurti.
What's a tunikurti?
It's a portmanteau! I really think this one's going to catch on. Tunic +
kurti = tunikurti, plus bonus semi-alliterativeness with "tunica."
Technically this is more of a combination of a cote, a caftan, and a
kurti...but let me know if you come up with a graceful blend of those
three words.
At least I've made use of some scrap fabrics?
And then immediately filled the space they'd occupied with scraps from this project but whatever.
 |
| I had some difficulty with where to put the top of the piece for everything to fit neatly. |
I started while I was in the midst of prepping the big brown wall in my living room for painting, so I had the whole floor to work with—untold luxuries of floor space, really. I've used probably half of the original 8-yard length of this lovely wool gauze on an earlier iteration (dubbed the "Victorian Orphan" dress, because it has the ability to instantly transform me into a Dickens protagonist/future typhus victim), so I needed to save space as much as possible to eke the full, longish skirts I've been favoring from the remaining yardage.
Of course, to get everything oriented right, I had to sketch the shoulder and neckline of the back twice. I wanted it laid out on the fold, and wanted to nudge the fronts as close as possible to make the most of the weird negative space a big, shaped garment tends to leave.
 |
| Maybe I'll just leave this room furniture-less... |
Nailed it. I also made use of one of the three rolls of tracing paper I've nabbed from clearance sections—an excellent use of five bucks here and twelve bucks there. I'll be in pattern paper for years, even if I do need to tape together sheets to get enough width.
Usually the extent of my project records are contained on a page or two of the itty-bitty notebook you can see on the floor up there, plus whatever I write here...which means I rarely have accurate measurements, let alone actual pattern shapes, of the pieces as they ended up being used. I'm trying to make a point of keeping better records, so when I have brilliant successes I can
replicate them. What a concept.
In this case, tracing off the back pattern also served to give me a starting point for the fronts, which are nearly identical. I only offset the pattern from the edge by about two inches (eyeballed, because I am far from a proper seamstress) and shortened the front hem a touch. I marked potential necklines, but I've always had more success cutting them after a few fittings, so I'm going to leave them uncut until I get more of the garment put together.
 |
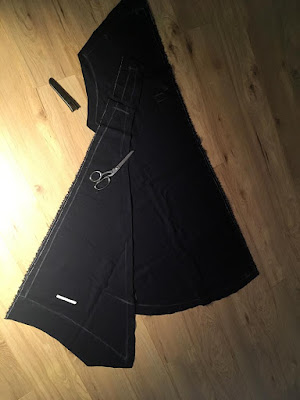
| I always did love those exploded view diagrams in K'nex and Lego sets. |
Speaking of not being a proper seamstress, it took looking at this photo to figure out why the side panels seemed so much too long for their locations. The length is based on the length of the front and back panels, which of course are shoulder to wherever-the-hem-falls. Incidentally, many humans have arms, and side panels generally stop below the arms. Oops.
Okay, so aside from the side panel mishap, this is roughly what the pieces look like; fronts on the left, back on the right, for the sake of not having to unfold and refold things. The sleeves will also need to be re-cut a bit. They're the first version of the sleeves for the Victorian Orphan dress, and not quite wide enough at the sleeve cap to make it around my arms. Luckily, they're plenty long enough to let me cut new, wider sleeve caps, and still be full length.
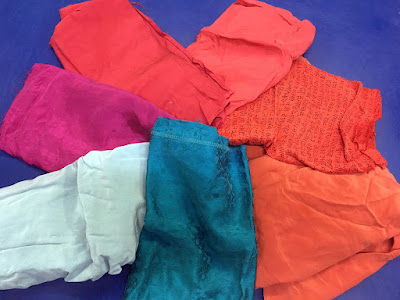 |
| The laundromat table really makes those reds and pinks pop. Maybe I'll do photoshoots there more often. |
I took this photo at about 5 in the morning. At the laundromat. Let's blame the side panel mishap (and the false start with the back orientation) on my predilection for having a laundromat entirely to myself.
Anyway, these are the remnants of seven silk shirts I cut panels from for some homemade patchwork curtains, and they've been taking up space in my scrap box ever since. I've toyed with all kinds of ideas for them, including quilts, but the fabric is so soft and wriggly that I kind of despair of cutting precise triangles from it. Instead, I'm going to make them into scrappy piping on all the piece edges of my tunikurti—no precision cutting needed.
That'll also get me out of needing to finish the seams somehow. The wool gauze I'm using is beautiful, but because it's so fine and loosely woven, it's remarkably prone to unraveling, and it's spongy enough that both French and flat-felled seams are just too bulky for my purposes.
 |
| Blasphemy, sacrilege, etc. |
And yes, I ironed all my silks, and used water on them, and nothing was ruined. So far my experience with silk is that you can wash it and iron it much like any other fabric—you can't use a very
hot iron, because it is still a protein fiber and too much heat will damage it, but I'm not sure how else you'd get creases out.
I also rolled up a piece or two of each of the colors on a spare dowel to make transporting them easier, and minimize the risk of pressing new creases into them.
 |
| That's a much more rational length for side panels. |
With apologies for the terrible picture, I did correct the vastly too-long side panels, and luckily only had to trim off a little bit of silk where I'd already stitched it along the extension. The hems will still need plenty of neatening, but I was already expecting that.
 |
| The colors really work well together, even if they do throw off the camera about the main fabric color. |
I'm not bothering to be at all very precise about the width of the silk trim; it and the edge of the wool piece will be neatened up at once, when I trim them to make "piping" filled with the excess silk and whatever seam allowance I leave on the wool. I'm also hoping not to pay for my laziness in not actually seaming the silk strips together...they should overlap enough that when I pull them around and tack them down the raw edges will stay enclosed.
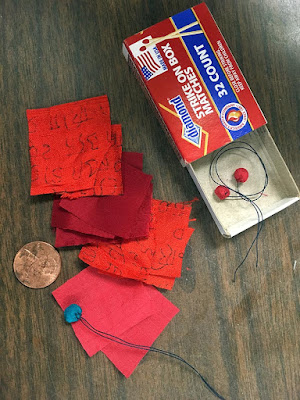 |
| I wonder how many itty bitty buttons I can fit into that matchbox. Probably not enough for this project. |
I also, to avoid wasting even the most minuscule potentially workable scraps, decided to make about a thousand tiny fabric buttons to go down the front of the tunikurti. The current plan is to match them with very fine rolled fabric loops on the opposite side, but the perpetuity of objects on the material plane may get in the way of that. Which is to say, I might need to pack the buttons so closely that only thread loops will work as their counterparts.


Comments
Post a Comment