The upper sleeves are theoretically an easy part of this dress—I have a pattern that fits well, it's only shaped at one end, and otherwise they're straight tubes. What could be simpler?
A lot of things, apparently.
 |
| Case in point. |
For one thing, the wise seamstress doesn't cut her fashion fabric before she's finalized her pattern. I didn't do that—and if I were attaching straight cylindrical sleeves to my bodice, I'd be fine. I shaped the sleeve cap to fit it to my shoulder, though, so now I need about two more inches of length to reach from the highest point of the sleeve cap to my elbow.
 |
| Ironing boards make great adjustable-height tables if you don't mind the wobbling. |
It was okay, though! I had a
plan. Since the sleeves are mostly straight cylinders, all I really needed to do to extend them was to use the embroidered bands as integral parts of the outer layer, rather than applying them on the surface of the base fabric. This also saved me needing to graft the tiny bands before stitching them onto the base fabric. Not a step I had been looking forward to, so avoiding it was just fine with me.
 |
| The linen sleeve linings are still conjoined in the middle here. |
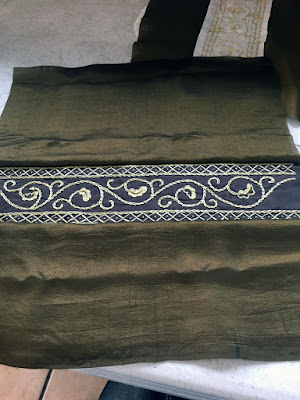
I laid out the embroidered bands on their respective sleeve fabrics, which were also arranged on
their respective linings. Right after this photo, I cut the linings apart and started keeping the pieces for each sleeve wrapped up separately. The sleeves might theoretically be nigh-identical, but it wasn't worth risking.
 |
| No need to make the back of the embroidery pretty when it's going to be hidden in the end. |
Because the bands were going to be integral to the outer layer of sleeve fabric, I needed to attach them in a different way from the other embroideries. Rather than backstitching through the outer lines of chain stitch, I ran a tiny running stitch just outside the very edge of the embroidery with the band placed right sides together against the base fabric.
 |
| Halfway there! |
When I flipped the band back, it looked the same as the other bands elsewhere on the dress. Perfect! I'm also very proud of not catching the outermost loops of chain stitch in the seam.
 |
| Needs ironing. |
I cut the base fabric just past the seam, leaving about a quarter-inch seam allowance, and repeated the process on the other edge of the band to graft the newly-created panel back onto the sleeve.
 |
| I have never in my life been so grateful to have muscular arms. |
Grafting the embroidery was a little fiddly, but I am
very good at this now, and I hadn't done any acorn-only curls on these bands yet. That saved me a lot of finger-pricking, I suspect; satin stitch with several inches of excess fabric to keep out of the way on either side and a closed loop of fabric besides would have been A Challenge.
 |
| I moved a lamp to try to make these late-night photos look better and it sort of worked. |
Next time I attempt something like this, I'm going to construct the lining entirely first, and mount the fashion fabric over it. Because I wrapped the heavier linen (heavier in this case meaning "not as thin as the silk." It's still handkerchief-weight linen) around the completed sleeve, I ended up with a few wrinkles on the inside when I turned the sleeve right side out. It's nothing too annoying, but I'd like to do a neater job now that I know better.
Anyway, first I sewed a plain running-stitch seam. I love running stitch, especially on fine fabrics.
 |
| Note the sheerness of the fashion fabric where it's falling away from the lining. |
Then I trimmed one of the linen edges and folded the other seam allowance down to enclose it. I fiddled with the fabric edges that will form the under-arm opening until I had a pretty smooth transition from the felled sleeve seam to the whipped open edges.
 |
| Itty-bitty whipstitch! Another favorite stitch. |
No photos of the sleeve seam, but it's just my usual slip stitch. I whipstitched a few extra times at the point where the sleeve opens out, to reinforce that corner, and continued up each of the open edges. These edges won't be attached to or covered by anything else, so I kept the stitches as small as I could.
In the background you can also see the pins marking the line of the sleeve cap, which I basted before declaring these finished!
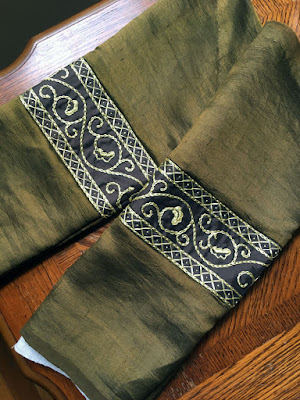 |
| Pretty slick for all the on-the-fly corrections. |
Incidentally, this is the color I see most often when I look at this fabric, which is why I call it green. You can call it whatever you like.


Comments
Post a Comment