Maybe not
allergic, exactly, but I do gravitate to way-more-complicated-than-entirely-necessary. And that's definitely the case with this skirt pattern, which features all kinds of fiddly bits I'm figuring out as I go along, because I've never made something like this before.
 |
| I basically grew up on those exploded diagrams you get with k'nex and lego sets, and that's still how I think about constructing any three-dimensional object. |
So, I've been wanting to make a few cool-weather skirts from the wool yardage left after making
K's hosen and
my red hosen, and I have just short of a yard of 60" fabric from each. Plenty for a knee-length skirt for me, or even longer, if I do a simple pattern.
If. That was the plan until I started sketching, and then I thought, well, I should go ahead and mock this up, just to see if my pattern pieces will even go together to make the correct shape, and then I'll know how many and what sizes I need, and I can lay out the pieces to see if they'll fit on the fabric I have to work with. (They won't. I am 98.4% certain they won't. But I'm gonna try anyway.)
 |
| Pro tip: don't use that Joann's "linen-look" stuff for undergarments. Just buy cotton. |
Also, it was the excuse I've been waiting for to chop up my first-ever SCA chemise, which has been taking up space in my scrap fabric bin for years now.
(Look. Look. Stop screaming for a moment. It's made of very very terrible cotton-poly fabric that doesn't breathe worth
shit, it looks horribly dirty next to everything in the world, I have three (3) linen chemises now, and furthermore: it's mine, I created it, I am its alpha and its omega.)
 |
| #stylish |
Besides, now I have a sexy outfit for the next zombie walk.
 |
| I really should have noted exactly which way to seam all the pocket pieces so they'd line up right. |
I wanted to try fancy slash pockets, instead of the side seam pockets I've been adding to all my other skirts, so I started with the pocket mockups. It probably would have been smart of me to mark the "right" and "wrong" sides of the fabric before I started construction, just to make my records of the process more useful to future-Sabine...but instead, I'll be pinning the pocket pieces this way and that on the final garment, too.
The tricky thing is getting the seams on the correct faces—all three seams involved in making this type of pocket should end up on the
outside of the pocket, but the top-front piece (the top pinned piece above, and the folded-over piece below) folds down to conceal the seam between it and the bottom-front of the pocket, and that one little detail just melts my brain.
 |
| Now you see it... |
 |
| ...and now you don't. |
I did eventually get everything facing the right way (mostly) after a few tries, and was deeply satisfied to discover that not only would these pockets fit my phone and keys easily, I can stash
an entire trade paperback in them without trouble (and my keys and phone would still fit).
 |
| Okay, so they're not straight pleats. Picky, picky. |
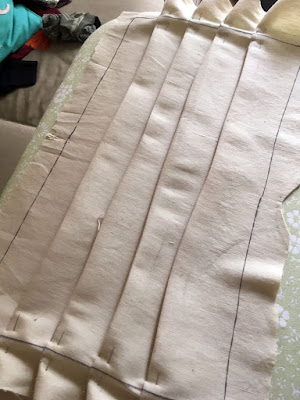
After the pockets, I thought I'd tackle the pleated panels, which surely wouldn't be all that difficult.
Uh.
I'm the last person to claim that I'm a
talented person with an iron, but my first attempt at neat little pleats was pret-ty abysmal. I thought I could get away with only marking and pinning the top and bottom of the pleats, and I'd just pull the fabric taut across the grain and press it in place to set the pleats. Clearly, that didn't work...and this fabric is stretchier than I remember, so pulling it taut was out of the question.
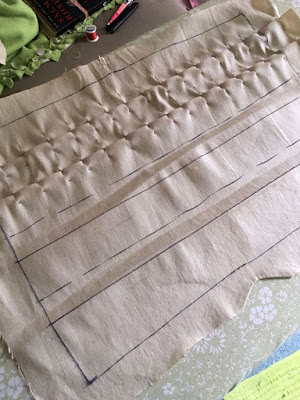 |
| It would have been wise to iron this piece completely flat before fixing those pleats, yes. |
So I broke out the yardstick and the sharpie to mark every single pleat on each of four panels, and pinned the daylights out of each one before I ironed them. I think, should I by some miracle have enough wool to pull this skirt pattern off, I'll topstitch the pleats just where they crease, to encourage them to lie nicely while letting them open as far as possible when I move.
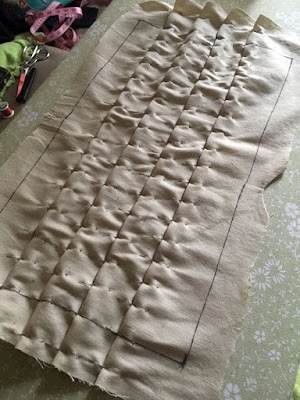 |
| It's such a good thing I have scads of pins. |
This fabric, for all its many (
many) faults, presses rather well, so I got to transform this puckered mess into a reasonably well-behaved panel.
 |
| Be. Flat. |
I left the pins in for most of the sewing, partly out of laziness and partly because I wasn't sure how much handling they'd take before softening up again, and I wasn't going to do the topstitching for the mockup. That is firmly in the Too Much Work category.
 |
| Hmmmm. |
There was...an odd happenstance when I started pinning the long, plain panels to the pleated panels, though. They should have matched in length, and instead, I have about five inches to spare at the tops of the plain panels. Because it's
me, I just kept sewing (also, the machine lives at a friend's house, and I actively wanted to minimize handsewing with this fabric. I'd forgotten how little fun it is to work with high-polyester blends) and figured I'd solve the mystery later.
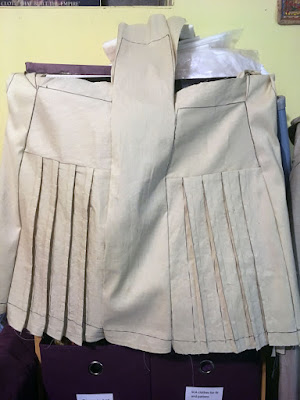 |
| Something's gone awry here. |
Much later, it occurred to me that when I'd laid out the pocket panels on the fabric, I hadn't added the length to make up the difference between mid-hip, where I wanted the slash to open, and my actual
waist, where I was trying to place the waistband. So I have a mockup of a mid-rise skirt right now, and I'm still deciding whether to add in the missing fabric to test it as a high-waisted skirt instead.
I probably will. That was...at least a third of the point of this exercise. Also, cute though the skirt is now, I expect I'll get more use out of it with a higher waistband.


Comments
Post a Comment