My wee sister, who I love and who therefore gets away with asking for very specific handmade Christmas presents at Thanksgiving, told me this year she really wanted a beanie with a pompom on it. She gave me a few reference pictures to work from, I picked some stash yarn (yes!! I know!! I did not buy any more yarn for this! It's a Thanksgivingmas miracle), and found
a cute pattern with interesting-but-not-mind-bending textures.
 |
| Aka Why Blocking Is Important. |
(We also featured it in an Instagram post at work, so that was cool.)
 |
| Maybe if I ignore how wrong it is, it'll fix itself? |
Unfortunately, I blindly followed instructions even as I realized that I was going to both run out of yarn and create a hat far too big for V, until I had three inches of ribbing and two repeats of the main pattern. Then I admitted defeat, and ripped everything out (sigh).
 |
| Cutest stitch marker ever, though. |
Because I was at work, and the ribbing needed to be worked on smaller needles than the main pattern, I restarted with a crochet chain provisional cast-on, removing two repeats of the main pattern to get a smaller hat (and save some yarn).
 |
| There are not quite enough objects in this photo to play I Spy. |
The rest of the knitting was pretty uneventful, but I thought I'd take photos of how I weave in ends on
stretchy projects all knitting is stretchy, Sabine, come on projects with ribbing at the edges. Step One: Get a metal needle of some kind. It feels nicer in the hand, and the point is much less prone to getting stuck and pulling your stitches.
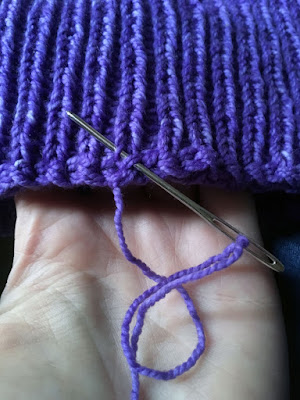 |
| Stabby stabby. |
Step Two: Weave the first end from the edge up to the base of the ribbing, following the path of the existing strands as much as possible. (Bonus points: this hat is designed to be worn with the brim folded or not as you please, so it needed to look nice on both sides.)
 |
| Stitchy stitchy. |
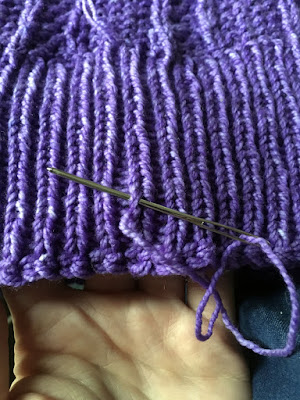
Step Three: Spiral up one side of a column of knit stitches, matching the spiral of stitching to the direction and angle of the existing knitting, so it vanishes into the fabric.
 |
| There are double ends everywhere because I was imitating worsted-weight with sock yarn. |
Step Four: Tie a firm square knot with one of the handy ends you've just lined up with. Or take a few stitches sideways and tie the tail off around a knit stitch (if you're looking at the back of the work. That way, even if there's some distortion, it'll be less noticeable on the right side, where it'll be a slightly distorted purl stitch).
 |
| See? |
Step Five: Trim the ends nice and short, and stretch the piece a few times each direction to settle the stitches.
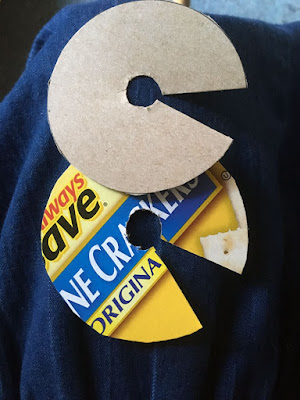 |
| If you don't have a cracker box, that's fine, cereal boxes work, too. |
V also requested a big pompom on her hat, so I made a little template out of the conveniently-empty cracker box in my cabinet. (I
also ended up making a splatter shield out of the box leftovers so I could more effectively pulverize chickpeas with my hand mixer without spraying them all over the kitchen, and it worked a treat.) The two pieces are so I could wiggle a needle between them before cutting all the threads, to tie everyone together neatly, and it's shaped like Pac-man so I don't have to stuff my bundle of yarn through the center to make each wrap.
 |
| I have no idea if this is correct, but it's what I did. |
Wrap wrap wrap wrap until bored (or until you run out of yarn, like I did). Make sure the tail(s) end up at the outer edge of the template—that's where you cut the wraps to transform the whole thing into a pompom. If you end at the center, you'll have strands that work themselves free, because they're only barely tied in place.
I snipped about a third of the wraps, then worked a curved needle threaded with the very last of the yarn between my two templates and tied it as tight as I dared. I snipped the rest of the way around, fluffed up the resulting pompom, and trimmed a few of the longest wraps so it wouldn't look like it was having a bad hair day.
 |
| Can you tell I turned the overhead light on? |
And then I cleverly didn't take a picture so you'd have to read this whole post! Aren't I sneaky? (It was too blurry to use, but of course I didn't realize until long after the fact.) I also nearly attached it to the inside of the hat, but luckily I noticed before I'd trimmed any threads.
I anchored the tails from tying the pompom the same way I'd anchored the other ends, by weaving them down a line of knit stitches and tying them off.
 |
| Featuring one of the most beautiful picture books I own. |
Et voila! Finished beanie, with a pompom that is satisfyingly the right size and fullness without any fudging (good thing, because all the yarn is
gone). It's nice and warm, too.


Comments
Post a Comment